


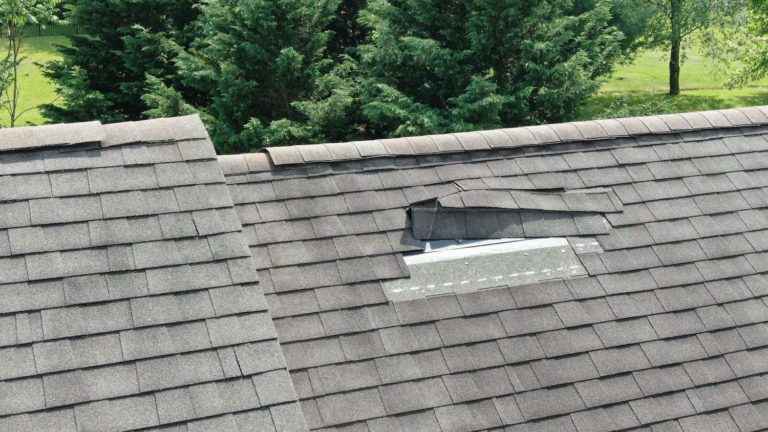
If you look up at your roof and notice that shingles have blown off after a windstorm, the easiest way to repair the damage is to individually replace the missing shingles. And, no, your roof shingles shouldn’t usually blow off from a strong wind. In fact, it takes a few things to make this happen:
- Decades of wear and tear
- Prior wind damage
- Powerful winds gusts
- Poor installation
While noticing that some of your shingles have blown off is shocking, don’t fret because fixing it is not as daunting as you think. You can also tarp your roof as a temporary fix to mitigate further damage, but we’ll get to that.
Our free step-by-step guide will teach you how to repair roof shingles blown off from a storm. It will also educate you on how to spot them, how to replace them, and the importance of catching them early.
HOW AND WHY DO SHINGLES BLOW OFF YOUR ROOF?
The first thing you need to know is that it usually takes a combination of things to make this happen. For example, if your shingles are 20 years old and have never had any damage, they’re more likely to withstand high winds than if they were only five years old with prior wind damage.
POOR INSTALLATION
Shingles that have been installed correctly are much less likely to blow off your roof than those that haven’t. This is because the nails used to hold them in place are driven into the sheathing, the layer of plywood or OSB beneath the shingles. If they’re not driven in correctly, they can work their way out over time, and eventually, the shingles will blow off.
LOOSE NAILS OR ADHESIVE STRIPS
Loose nails or unadhered adhesive seals can also make your roof susceptible to blown-off shingles. Your nails and adhesive are vital to keeping those shingles tight against your roof, preventing leaks and other penetrations. While these failures can occur due to poor installation, they can also deteriorate over time from wear and tear and facing the elements.
YOUR ROOF IS OLD
As your roof ages, the materials start to deteriorate. The asphalt begins to dry out and become brittle, making it more susceptible to damage such as bending, cracking, and lifting. Regular maintenance can help prolong the life of your roof and help catch issues early on that might lead to blown-off shingles from wind or leaks from cracked shingles.
THERE WAS UNDERLYING DAMAGE
If you had a recent storm with high winds and your shingles blew off, it could have been started by prior damage. It’s important to have a professional roofing contractor inspect your roof after any type of severe weather to ensure that there is no underlying damage because leaving that untouched can mean worse damage and expensive repairs the next time.
INCREDIBLY STRONG WIND GUSTS
Most shingles are rated to withstand winds up to a particular mileage per hour. At MARS Restoration, we work with a few of the top shingle brands in the industry: IKO, GAF, and Certainteed. They each have various wind warranties and ratings based on testing indicating what speeds they can withstand.
These shingles, in particular, may be covered under warranty for up to a certain wind speed. However, tornado and hurricane winds of 150 or more can do severe damage on your roof that absolutely blows them off and may or may not be covered under your warranty. Here are current warranty coverages for IKO, GAF, and Certainteed:
IKO DYNASTY SHINGLES
- Limited high-wind warranty coverage for winds up to 130 mph
- Class 3 Impact Resistance rating
GAF TIMBERLINE ASPHALT SHINGLES
- 15-Year Limited WindProven Warranties
- Passed laboratory wind test ASTM D3161, Class F to 110 mph
- Passed laboratory wind test ASTM D7158, Class H to 150 mph
CERTAINTEED LANDMARK PRO SHINGLES
- 15-year 110 MPH wind warranty with possible upgrade to 130 mph
- Wider nail track to prevent lifting shingles
- Passed ASTM D7158 Class D up to 116 mph
- Passed ASTM D7158 Class G up to 155 mph
7 SIGNS OF BLOWN OFF SHINGLES
Yes, it seems obvious that missing shingles would be the first sign of blown-off shingles— but some underlying signs can indicate what you can’t see at first glance. Knowing what to look for can help prevent further damage because you may notice something before it gets worse, so you can act fast to fix it.
- Your energy bills have spiked recently
- There’s water damage on your ceilings or walls
- Shingles are missing from your roof
- There are granules in your gutters (this is a telltale sign of shingle deterioration)
- Shingles are crooked as if they have shifted
- You see nails sticking up or sitting on the roof
- Shingles are on your lawn or your neighbor’s lawn
If you have noticed any of the signs above, it’s time to take action.
WHAT HAPPENS WHEN YOU NOTICE BLOWN OFF SHINGLES? HOW TO TARP YOUR ROOF
Like we said, the faster you jump on repairing your roof, the faster you’ll be able to mitigate further damage. Right after noticing missing shingles, the best thing you can do is tarp your roof until you can fix the problem. This will help prevent further damage from winds or rain.
TOOLS YOU’LL NEED:
- Ladder
- Hammer or nail gun
- Tarp (large enough to extend past the damage)
- 2x4s
- Ropes
If and when it is safe, you can get up on the roof and cover the area of your roof that had shingles blown off during the storm. If possible, use a tarp that is large enough to extend past the damaged area on all sides by at least two feet. This will give you something to attach the tarp to and will also help keep it in place during high winds.
HOW TO ATTACH THE TARP:
- Use ropes or bungee cords to secure the edges of the tarp to the chimney, vents, or any other part of the roof that is not damaged.
- If you don’t have anything to tie the tarp down with, you can use two-by-fours to hold it in place.
- Nail or screw the boards into the edges of the tarp and then nail or screw them into the roof, so they are perpendicular to the tarp.
- Ensure the tarp is tight, so it doesn’t flap in the wind and cause more damage.
Now that you know how to temporarily fix your roof, it’s time to focus on how to permanently fix it by replacing shingles that have been blown off.
HOW TO REPLACE YOUR SHINGLES (STEP-BY-STEP)
If you have determined that the damage to your roof is severe enough to warrant replacing the shingles, here are a few things you’ll need to do.
First, you’ll need to gather some supplies:
- Tape measure
- Hammer
- Roofing nails
- Roofing cement
- Putty knife
- Pry bar or nail puller
- Galvanized roofing nails
- Ladder
- Matching shingles
STEP 1: REMOVE THE DAMAGED ROOF SHINGLES
If the blown-off shingles are already completely detached, perfect. But, you’ll want to check the area where they were adhered and make sure there aren’t other damaged or loose shingles. If so, carefully pry those up using your pry bar and nail puller, and also remove all the old nails.
STEP 2: ASSESS THE DAMAGE
Now that all the damaged shingles have been removed, you can get a better idea of how much damage has been done and how many new shingles you’ll need to replace. Ideally, you’re getting a professional inspection done to get a deeper dive into the damage and see if there have been any water leaks or other issues caused during the time they were blown off.
STEP 3: PATCH ANY HOLES
Using roof patches or caulk, you should seal any nail holes or other tears in the roof deck before ever placing your first replacement shingle down. Laying those on top can just lead to future leaks if you don’t manage the underlying holes beneath.
STEP 4: INSTALL YOUR NEW SHINGLES
Now, it’s time to start nailing in your new shingles. Begin at the bottom of your repair area and work up.
- Start by cutting a strip of shingles that is long enough to cover the entire length of your repair area. Place this row along the edge and nail it into place.
- Now, you’ll want to place your next row of shingles (or individual shingles) on top of the first row, overlapping each one as you go.
- Be sure that each new row overlaps the one below it by at least two inches (this is called the “offset”), and you are nailing into the last shingle’s nailing area.
- Once all of your rows are in place, apply a layer of roofing cement as an added security measure.
FORGET THE DIY METHOD: HIRE MARS RESTORATION TO GET THE REPAIRS DONE RIGHT
While this guide provides a helpful overview of how to replace your own shingles, we understand that not everyone is up for the task of DIY roof repair. If you require assistance or would prefer to avoid any potential risks associated with repairs, our team at MARS Restoration is here to help.
We have the experience and expertise necessary to complete the job quickly, efficiently, and correctly. Contact MARS Restoration today to learn more about how we can help you get your shingles back in place and your roof back in tip-top shape!